The Glymmsforge Catacombs
Side-Quest:
The Catacombs
On the outskirts of the city of Glymmsforge can be found many entrances into its ancient and sprawling catacombs. Only the foolish would dare enter the darkness of those crypts, for vile ghosts and phantasmal creatures lurk within. Yet thanks to the whispers of riches beyond measure to be found in their depths, a steady stream of adventurers still venture into the gloom to try their luck.
Most are never seen again.
You lead one such party of treasure hunters, so the question is: how long can you survive in the depths of Glymmsforge?
The rules found here will allow you to venture into the Glymmsforge Catacombs, either alone or with a group of fellow adventurers, to see what treasures you can find and how long you can survive. Here you will play multiple games of Age of Sigmar, each linked in a mini-campaign, battling not against an opponent but against the game itself, which will throw all manner of Nighthaunt adversaries at you.
The original PDF can be found here:
The Measure of Success
When playing the campaign, it is a given that your adventuring party will eventually be wiped out. Indeed, the campaign does not end until every Hero in the adventuring party is slain. The measure of success is how many chambers you can clear before your eventual demise.
Thus, you will see lots of rules in this section referring to ‘clearing a chamber’. While playing through the campaign, keep a tally of how many chambers your adventuring party clears. If you are playing as a team of players, you may also wish to keep a tally of how many adversaries your
Hero slays, so that the player with the highest score at the end of the campaign can be celebrated.
Getting Started
To play through the campaign you will need the following:
- A flat surface roughly 30″ by 22″ in size. A Warcry board is perfect, but a coffee table or even the floor will suffice!
- A selection of Heroes (we recommend 3-4).
- The following Nighthaunt units:
- 1 Knight of Shrouds on Ethereal Steed
- 1 Lord Executioner
- 1 Spirit Torment
- 1 Guardian of Souls with Nightmare Lantern
- 20 Chainrasps
- 5 Glaivewraith Stalkers
- 4 Grimghast Reapers.
- The warscrolls for your Heroes and the Nighthaunt units.
- Dice, a tape measure, and anything else you would usually bring to a game.
Forming the Adventuring Party
To play the campaign you must form an adventuring party. This will be the army you use in each battle during the campaign. This game is designed to be played solo, or as a team of players that work together.If playing solo, we recommend you choose 3 Heroes to make up your adventuring party. If playing as a team, we recommend each player takes control of 1 or 2 Heroes. The number of Heroes determines how many adversaries there might be in a dungeon chamber, so choosing more
Heroes does not necessarily give you an advantage.
Follow the steps below to form your adventuring party:
- Pick 1-4 Heroes, each with a Wounds characteristic of 9 or less, that are not named characters.
- You can pick more than 4 Heroes, but if you do so, you will require a number of Nighthaunt miniatures that exceeds the content of the Soul Wars box. If one of the players has a Nighthaunt army, they should have ample miniatures to use.
- Choose an allegiance for each Hero. Each Hero can have a different allegiance.
Adventuring Party Special Rules
In general, the campaign uses the standard Age of Sigmar tabletop game ruleset. That said, there are special rules that are used to make the campaign work for solo play. The following rules are used for the adventuring party during the campaign:
Lasting Injuries
After each battle, keep a track of which Heroes from the adventuring party were slain in that battle and which Heroes had any wounds allocated to them in that battle.
Heroes that are slain are permanently removed from the adventuring party. Heroes that have any wounds allocated to them start the next battle with the same number of wounds allocated to them.
Rewards to be Found
No allegiance abilities are used for the adventuring party to begin with, but as you venture deeper into the Glymmsforge Catacombs you may be awarded artefacts of power, command traits and other rewards from your set of allegiance abilities.
Desperate Allies
Although the Heroes in the adventuring party might have different allegiances, they are considered to be a single army. This means the adventuring party gains 1 command point at the start of each battle round (for the players to choose how to use) and the Heroes treat each other as friendly models.
The Cardinal Points
The battleplans used in this campaign will refer to North, South, East and West. When the battlefield is set up, the players should nominate one of the long battlefield edges to be north facing, and the others to correspond to that.
The Exploration Role
At the start of the campaign, and each time a chamber is cleared, you must make an exploration roll to see what the next chamber holds. Most chambers will harbour adversaries, requiring you to defeat them in battle before the chamber is cleared. If you are lucky, however, you might find an empty chamber in which you can rest, or even one with treasure inside!
To make an exploration roll, roll 2D6 and consult the table below
Spoils of Battle
After winning a battle, you can roll once on the loot table below
Ending the Campaign
The campaign ends as soon as all the Heroes in the adventuring party are slain. If you play through the campaign again, the challenge for future attempts is to clear more chambers than you did before. Good luck – you’re going to need it!
Exploration Table (2D6 Results)
| 2 |
Boss Fight: Within this chamber resides a deadly foe! To clear this chamber you will have to win the ‘Boss Fight!’ battleplan |
| 3-6 |
Dungeon Fight: Enemies approach on all sides – stand fast and prepare to fight! To clear this chamber you will have to win the ‘Dungeon Fight!’ battleplan. |
| 7 |
Short Respite: This small chamber holds no enemies, allowing you a chance to rest. However, you cannot linger here for long. The chamber is cleared. In addition, before you make your next exploration roll, you can heal 1 wound allocated to each Hero in the adventuring party |
| 8 |
Long Respite: No immediate threats reside within this chamber, furthermore it can be easily barricaded, allowing you to rest and heal wounds. The chamber is cleared. In addition, before you make your next exploration roll, you can heal all wounds allocated to each Hero in the adventuring party. |
| 9-12 |
Treasure: This chamber holds ancient riches that will aid you in your quest. The chamber is cleared. In addition, before you make your next exploration roll, pick 1 Hero in the adventuring party and pick 1 of the following: Artefact of Power: You can pick 1 artefact of power from this Hero’s set of allegiance abilities and give it to them, if you have not done so already. Spell: If this Hero is a Wizard, you can pick 1 spell from their set of allegiance abilities for them to know, if you have not done so already. Prayer: If this Hero is a Priest, you can pick 1 prayer from their set of allegiance abilities for them to know, if you have not done so already. |
Loot Table
| 1 |
Spectral Lantern: This lantern illuminates the way forward in a ghoulish green light, but is soon spent. The next time you roll on the exploration table, add 1 to the roll (to a maximum of 12). |
| 2 |
Aqshian Flamewood Stake: Even the incorporeal forms of gheists are immolated in flames when a sharpened stake of Aqshian Flamewood is driven into them. Give this item to a Hero to carry. At the start of the combat phase, you can choose for the Hero carrying this item to use it. If you do so, pick 1 enemy model within 1″ of this Hero and roll a dice. On a 1, nothing happens. On a 2+, that model is immediately slain. Then, the Hero that used this item is no longer carrying it. |
| 3 |
Map Fragment: This torn piece of a map suggests there is treasure to be found further in the crypts. Keep a tally of how many Map Fragments you find. When the tally reaches 3, the next time you roll on the exploration table, the roll is automatically a 12, and then the tally is reset to 0. |
| 4 |
Scroll of Translocation: Arcane glyphs dance around this scroll, hinting at the magic it holds. Give this item to a Hero to carry. In your hero phase, you can choose for the Hero carrying this item to use it. If you do so, pick 1 model within 3″ of this Hero (including itself, if you wish) and remove that model from the battlefield. Then, set that model up anywhere on the battlefield. Then, the Hero that used this item is no longer carrying it. |
| 5 |
Grave-sand Ossuary: It is said that the grave-sand contained within these ossuaries gives one control over death itself. Give this item to a Hero to carry. In your hero phase, you can choose for the Hero carrying this item to use it. If you do so, pick 1 other friendly Hero that has been slain in this battle. You can heal 1 wound allocated to that Hero so it is no longer slain, then you can set it up on the battlefield within 3″ of the Hero that used the ossuary. Then, the Hero that used this item is no longer carrying it. |
| 6 |
Potion of Aqua Ghyranis: Filled with a liquid that sparkles like ground crystal, a few drops of this potion can heal grievous wounds in an instant. Give this item to a Hero to carry. In your hero phase, you can choose for the Hero carrying this item to use it. If you do so, heal all wounds allocated to that Hero. Then, the Hero that used this item is no longer carrying it. |
The Adversaries
During the campaign, the adventuring party will battle against Nighthaunt spirits, referred to as adversaries. These models are controlled by the game, rather than by an opponent. The following rules are used to dictate how the adversaries behave in battle
Battle Rounds
At the start of each battle round, one player rolls a dice. On a 1-3, the Adversary army takes the first turn. On a 4+, the players take the first turn.
Battle Rounds
When it is the Adversary army’s turn, a special turn sequence is used instead of the standard turn sequence, as follows:
- Action Phase
- Combat Phase
- Battleshock Phase
This means that if you have any abilities that can only be used in an enemy phase not shown in the list above, you cannot use that ability in battles for this campaign.
The Action Phase
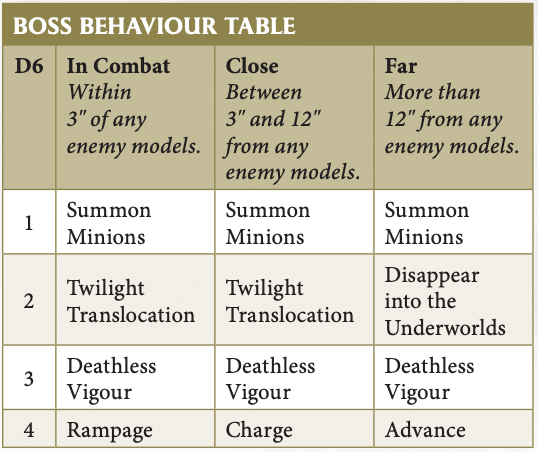
During the action phase, the players activate the units in the Adversary Army, one at a time, until every unit has been activated. Units in the Adversary army with the Hero keyword are referred to as Boss units. All other units are referred to as Minion units. To activate a unit in the Adversary army, roll a dice and consult either the Boss behaviour table or the Minion behavior table, both of which can be found on the following page.
Each behaviour table has 3 columns, each with 6 results. To determine which column to use, start with the column on the left and check to see if the unit meets the criteria written below the title of the column. If not, move on to the middle column and check again. If the criteria are still not met, move on to the column on the right. Each result on the behaviour table has a corresponding list of actions that the unit will perform. The actions are carried out in the same order as they appear on the behaviour table. Immediately resolve the actions before activating the next unit in the Adversary army.
Many of the actions require the players to determine the closest model or closest unit. If there are ever two or more eligible models or units, the players can pick which is treated as the ‘closest’ for the purpose of that action.
Boss Actions:
In addition to the actions dictated by the behaviour table, boss units each have their own special actions as described below:
Knight of Shrouds on Ethereal Steed
Lord of Gheists: At the start of the combat phase, this model will use its Lord of Gheists command ability. When it does so, the closest other friendly unit within range of the command ability that is within 3″ of any enemy units is picked as the target of the command ability. If there are no eligible units, then this model is picked as the target
Spirit Torment
Captured Soul Energy: At the start of the battleshock phase, if it is eligible to do so, this model will use its captured Soul Energy ability. When it does so, pick a target as follows:
- If there are any friendly units within range of the ability that have had models slain, the closest one is picked and the ability is resolved.
- Otherwise, if there are any friendly units that have any wounds allocated to them, the closest one is picked and the ability is resolved.
Guardian of Souls
Spectral Lure: Each time this model is picked to activate, once all its actions determined by the behaviour table have been resolved, it will attempt to cast the Spectral Lure spell. Enemy Wizards can attempt to unbind the spell as normal. If it is successfully cast, the target is picked as follows:
- If there are any friendly units within range of the spell that have had models slain, the closest one is picked and the spell is resolved.
- Otherwise, if there are any friendly units that have any wounds allocated to them, the closest one is picked and the spell is resolved.
Unbind: This model will attempt to unbind the first spell that is cast within 30″ of it in the enemy hero phase.
Lord Executioner
Staring Death in the Face: At the start of the combat phase, if it is eligible to do so, this model will use its Staring Death in the Face ability. When it does so, pick the closest enemy Hero as the target.
Behaviour Tables

Tormented Spirit:
The unit does nothing. In addition, it is not picked to fight in combat phase this turn.
Hold:
The unit does nothing in the action phase of this turn.
Rampage:
This unit immediately fights. It is picked to fight in the combat phase of this turn too.
Advance:
The unit makes a normal move. Each model from the unit must finish the move as close as possible to the closest enemy unit.
Charge:
- The unit makes a normal move. Each model from the unit must finish the move as close as possible to the closest enemy unit.
- The unit attempts to make a charge move towards the same enemy unit. The first model moved in the unit is the model closest to that enemy unit.
- If the first model moved can finish its charge move within ½” of the enemy unit, it moves as close as possible towards the enemy unit and the charge is
successful. Otherwise, the charge fails and no models from the unit move. - If the charge is successful, each model from the unit must finish its charge move as close as possible to the enemy unit

(a note, the original article only gave this table four results, I’d just re-roll until you get a 1-4 personally)
Summon Minions:
Add 1 Chainrasp Horde unit consisting of D6 models to the Adversary army and set it up wholly within 3″ of this model.
Twilight Translocation:
Remove this unit from the battlefield and set it up anywhere on the battlefield more than 12″ from any enemy models.
Deathless Vigour:
Heal D3 wounds that have been allocated to this model.
Rampage:
This unit immediately fights. It is picked to fight in the combat phase of this turn too.
Disappear into the Underworlds:
Heal D3 wounds that have been allocated to this model and then remove it from the battlefield. In the following action phase, do not roll on the behaviour table for this model. Instead, the players must set it up within 1″ of an enemy unit.
Advance:
The unit makes a normal move. Each model from the unit must finish the move as close as possible to the closest enemy unit.
Charge:
- The unit makes a normal move. Each model from the unit must finish the move as close as possible to the closest enemy unit.
- The unit attempts to make a charge move towards the same enemy unit. The first model moved in the unit is the model closest to that enemy unit.
- If the first model moved can finish its charge move within ½” of the enemy unit, it moves as close as possible towards the enemy unit and the charge is
successful. Otherwise, the charge fails and no models from the unit move. - If the charge is successful, each model from the unit must finish its charge move as close as possible to the enemy unit
Battleplans
In order to cut down on having this page be absolutely massive, you’ll find the Battleplans on their own separate pages.
Find a mistake?
If you find any mistakes, or you find it plays better in some way, please feel free to get in touch with us and we’ll make it happen!
You can also get in touch on our discord!


