loader image

Goldswallow Pit

Goldswallow Pit-42c1aeca

Submitted by:

Tectonic Dan & Nuno Martins @WH_narratives

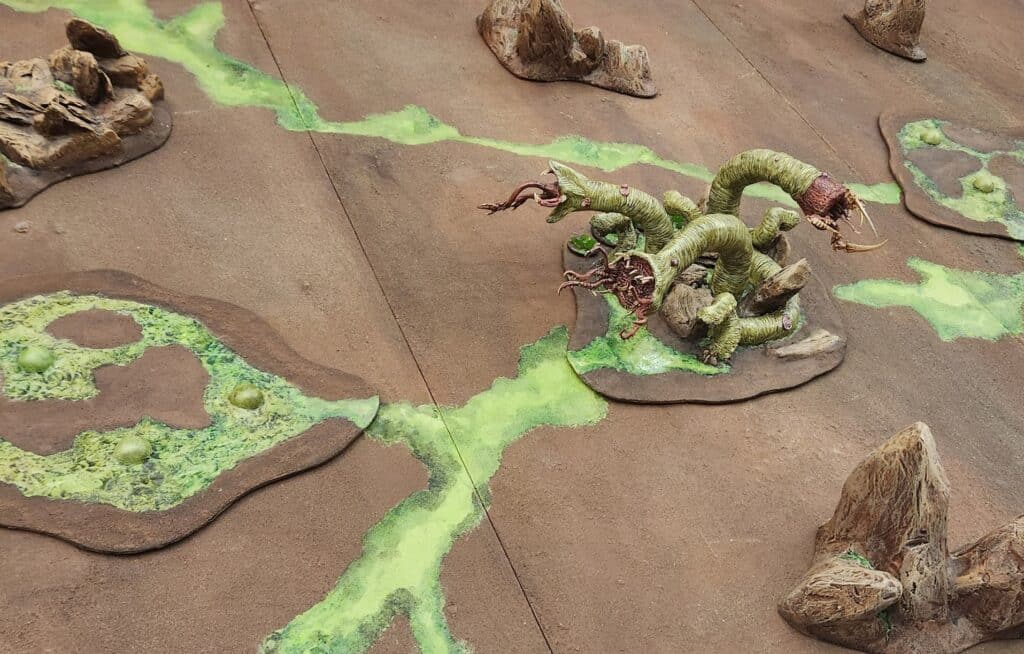
This sinkhole-filled bog is home to a gargantuan multi-headed worm beast who is rumoured to be guarding a glorious treasure. Recently she’s been eating well, as travellers have sought the loot she’s allegedly guarding.

She is said to be both patient and old, with much knowledge, little greed, and a casual-if-endless appetite for the flesh of intelligent beings. She absolutely despises all undead, refusing to speak of it aside from an old grievance against the Great Necromancer.
How exactly the stories of her and the treasure have spread is somewhat of a mystery, but it seems from the taverns of Khardihr, to the battle-barges of Da Choppas and the Reaver ships of Blackmaw, word of it has spread in exciting detail.

Goldswallow Pit-42c1aeca

Submitted by:

Tectonic Dan & Nuno Martins @WH_narratives

Rules:

Do not destroy without permission
Soulbound Doom Level: 7

Warcry Twist Rules:

Swampland. Subtract 1 from the Move characteristic of move actions on the battlefield floor. Flying fighters are unnafected.

Never go Alone: at the end of each battle round, roll a die for the fighter who is farthest from the center of the battlefield. On a 1-3 that fighter is taken down. If more than one fighter is tied for the distance, roll off to decide which.

Realm Rules:

(Rules based on Holy Havoc, Holy Wars, by Steve Herner)

Swamps: several terrain pieces scattered all across the table. Deadly terrain.

Wyrmrid Pit: This represents the pit of the multi-headed titanic worm. It blocks line of sight, and must count as a major central objective. At the beginning of each combat phase, all units within 12″ of the Wyrmrid Pit suffer from the bites of the worm: roll a D6 for each. On a 1-3, check the table below to see how much damage the unit suffers. These Wounds do not count towards battleshock. 

Battle Round 1: D3 Mortal Wounds 

Battle Round 2: D3+1 Mortal Wounds 

Battle Round 3: D3+2 Mortal Wounds 

Battle Round 4: D6+1 Mortal Wounds 

Battle Round 5: D6+2 Mortal Wounds

Rules:

Do not destroy without permission
Soulbound Doom Level: 7

Warcry Twists:

Swampland. Subtract 1 from the Move characteristic of move actions on the battlefield floor. Flying fighters are unnafected.

Never go Alone: at the end of each battle round, roll a die for the fighter who is farthest from the center of the battlefield. On a 1-3 that fighter is taken down. If more than one fighter is tied for the distance, roll off to decide which.

Region of War Rules:

(Rules based on Holy Havoc, Holy Wars, by Steve Herner)

Swamps: several terrain pieces scattered all across the table. Deadly terrain.

Wyrmrid Pit: This represents the pit of the multi-headed titanic worm. It blocks line of sight, and must count as a major central objective. At the beginning of each combat phase, all units within 12″ of the Wyrmrid Pit suffer from the bites of the worm: roll a D6 for each. On a 1-3, check the table below to see how much damage the unit suffers. These Wounds do not count towards battleshock. 

Battle Round 1: D3 Mortal Wounds 

Battle Round 2: D3+1 Mortal Wounds 

Battle Round 3: D3+2 Mortal Wounds 

Battle Round 4: D6+1 Mortal Wounds 

Battle Round 5: D6+2 Mortal Wounds

More from Ghur

Have you interacted with the location? Go ahead tell us!

Subscribe
Notify of
guest

1 Comment
Oldest
Newest Most Voted
Inline Feedbacks
View all comments
2 years ago

Outraged over a lack of smashin’ and bashin’, Boss Ugdrut Skullboota of Da Choppaz personally leads his boyz to hunt down “Da Khorney Gits” who keep krumpin’ his lads. They track the Iron Bloods to the Goldswallow pits, a murky region of the Dell that has bogged down the Khorne warriors’ search for Celestite.

This time Irox, Varon and their warriors are hard pressed between Orruk fury and the sinkhole-filled bog. It isn’t long before the skirmish draws the attention of a gargantuan multi-headed worm beast. Losses begin to mount on both sides as the monster ravages about bog.

As Varon and Ugdrut clash and Irox fends off the worm, Bloodreaver Bhalon Flesheater takes the opportunity to try to flay Khorne’s Scribe, Marisa Melborn. Unbound to unleash his hatred upon the scribe, manages to wound the human’s hip and kick her to the ground. Bleeding with a sudden spout of rage, Melborn draws her crude knife and lunges at the cannibal. The bone knife digs into his chest, drawing a crude smile from Bhalon. Marisa doesn’t stop and she jabs again and again and again.

It is only the scolding smith hand of Irox that pulls the scribe from her blood trance. After coming to, Marisa is horrified to see her bloody work. Irox simply nods, collects some of Bhalon’s blood, and withdraws with the scribe. Varon and the surviving Iron Bloods follow behind. The orruks choose to stay to test their light against the worm.

They take one long path around the battle to search for the rumored treasure of the worm.